Buying a Rural Property? Consider the Septic System

septci system

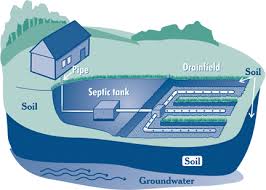
Typical Septic System

A private septic system can be the single most expensive item in a property to replace yet it is usually the most difficult to assess by visual means. Consequently it is a system that many people buying rural property, particularly an older one, often know the least about.


Any standard home and property inspection that I do involves evaluating those systems that are considered easily accessible. By their nature septic systems do not fall into that category. The main components of the system are underground. For that reason, septic systems fall outside of the scope of a regular home inspection. Certainly we will locate where the sanitary plumbing drains into the system and we will examine the ground surface where we believe the septic system is. The functional drainage is checked at all fixtures and unusual sewer odours are noted. Very few if any home inspectors that I know will go beyond that.

When I first started doing home inspections in the early 1990’s most septic systems went uninspected. If a prospective buyer did ask the seller or their real estate agent about the condition or age of the septic system, they might not receive much of an answer. This was probably because the home seller or the agent really didn’t know much about the system either. Sometimes the buyer might be told that the current home owner “hasn’t had any problems”  or that “the tank had been pumped and the pumper did not find any problems”, or words to that effect. In any event the reality more often that not was that everyone involved in the process – the home seller, home purchaser, real estate agent, and the home inspector – were largely in the dark.

Things have changed in many areas of the country since then. For instance, almost all real estate purchases in eastern Ontario involving private septic systems, have a clause in the purchase agreement that an inspection of the septic system be undertaken at the purchasers discretion and expense. That’s where the septic inspector comes in.

The septic inspection profession has evolved and developed over the last several years. Very often the septic inspection will be done simultaneously with the home inspection. So I have been present for dozens if not over a hundred septic inspections.

The septic inspection can take two hours. Normally there will be a crew of two. The inspection of a standard septic system has two main parts. First they will locate the tank. This is not always as straight forward as it might seem. At least one of the tank openings are accessed and opened and the contents of the tank are viewed. If the septic inspector does have the equipment to pump the tank, that procedure can be done then as well. Most of the time in my experience, the septic inspection does not involve a tank pumping. It is a value-added item however and does give the inspector a chance to see the bottom sections of the tank.

The second part of the inspection involves locating and accessing the tile bed, or as its sometimes known the leaching field. Again this can be a tricky procedure which can take expertise and experience to be successful.

There are a myriad of conditions the septic inspector is looking for so I won’t go through them here. The main point I want to get across is that almost all of the conditions and problems the septic inspector can and will find are only possible if they do a subsurface investigation. That’s why this service is so important in my view.

I have nothing against pumping septic tanks and in fact that is a necessary part of the upkeep of a septic system. There can be important information about the operating condition of the septic system available to a knowledgeable person pumping the tank. That person doing the pumping may or may not be comfortable rendering an opinion as to the health of the system however. If you as a buyer can be present during the pumping, I recommend it. The more information the better and information and clarity are the lifeblood of my profession. If we could get more knowledgeable experts doing full septic inspections on Prince Edward Island, the better off everyone would be. That includes sellers, buyers, real estate agents, and home inspectors.

David Glennie, CET, RHI

Posted in Septic Systems | Tagged , , , , , | Leave a comment

IMPORTANT – HRV Safety

There was a house fire in Tignish, PEI on Sunday, July 5, 2015. Thankfully no one seems to have been injured. According to the Tignish Fire Department,  the cause may have been an air exchanger in the house.

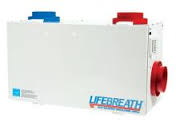
These air exchangers or as their properly known, heat recovery ventilators (HRV’s), have been linked to a number of fires in North America over the last several years. In many cases the cause was an overheating motor within the unit.

A common HRV. Note that they can be under a variety of different commercial names and look different from the unit shown here.

A common HRV. Note that they can be under a variety of different commercial names and look different from the unit shown here.

Venmar, the company that manufactures them, announced a recall in 2010. The recall was expanded in November of 2014. Note that many of these products will not have the name Venmar on them and that they may be under a variety of different badge names.

If you have any kind of an HRV in your home you should visit the following websites for more information on how to mitigate this risk:

Government of Canada Recall Page
Venmar Safety Upgrade Program 2010
Venmar Safety Upgrade Program 2014

There is also a phone number that you can call:  1-866-441-4645

Posted in HRV | Tagged , , | 1 Comment

DIY Electrical Work – The Perils

One of the most common deficiencies I see in homes involves the electrical system. And not all of them are centered on old wiring and under-sized electrical services.

A very common scenario is a relatively newer home with an adequately-sized electrical service and professionally installed wiring and devices in the original sections. The basement is often left unfinished by the builder and there’s where the rub usually is. The new homeowner and a few buddies will renovate the basement including the wiring. Most of the time the homeowner’s buddies will not be electricians. I should add that sometimes the above scenario includes contractors that use unqualified personnel doing the electrical work.

To a property inspector like myself it is usually apparent when electrical work is done unprofessionaly. And once electrical work has been identified as being deficient there is not necessarily much room for nuance. By implication it means the work was done unauthorized by any electrical regulation authority. Unlike many other building systems the proper operation of an electrical system directly involves safety.

electrical wiring faults 3

These electrical deficiencies were identified during home inspections in newer houses with recent basement renovations

electrical wiring faults 1 electrical wiring faults 2

Thankfully the instances of human harm or property damage due to improperly installed electrical equipment are relatively rare. When something does occur however the results can be catastrophic and tragic.

Some provinces such as Ontario do allow a homeowner to take out a permit, do the work, and get it inspected by their electrical authority. Prince Edward Island has no provision for homeowner-completed work. I think that this is unfortunate as it likely drives a lot of unauthorized electrical work underground and thus beyond the regulation of the authority.

I have no problem with DIY (do it your self) work involving electricity or any other of the trades involved with home renovation and construction. I do a lot of it myself. My view is like that of a well known home inspector with his own TV and that is if you’re going to do work at the house, particularly involving electricity, “just do it right!”.

Posted in Electrical | Tagged , , , | Leave a comment

Solar PV Systems – A Start For Me

I have been interested for some time in the concept of generating electricity via solar photovoltaic (PV). To my mind this aspect of sustainable energy development has nowhere to go but up from here. If you will pardon a bad pun, the future is bright in this space.

With that in mind I hiked myself over to Dartmouth, Nova Scotia for a one week intensive course in the design and installation of solar PV systems. The course was put on by the Canadian Solar Institute (CSI). All instruction in the course was done by a gentleman from the CSI named Mario Borsato. If there was a person anywhere who knows more about solar PV systems than Mario, I couldn’t imagine who that could be.

As for the course itself, it was very intensive. Mario admitted that the course could easily be 2 to 3 weeks long considering all the training that is involved. It’s just that most people can’t take that much time off of their regular work schedules and the cost of the training could get quite high for many folks. It was exhausting but I hungrily consumed all the information I could on this topic.

First solar panels

Me and my fellow trainees with our first solar panel installation at the Dartmouth Nova Scotia Community College (NSCC) campus. I’m 3rd from the right.

After this training I am confident that I could design and install a solar PV system at my own house or the house of a friend. It will take more experience for me to feel confident in providing this service on a commercial basis however.

I knew it was a relatively complex procedure to design and install a system like this. I didn’t realize how complicated and error-prone the procedure could be. One of the conclusions I reached after this training was that there likely is a significant number of these systems that have been installed the last few years that are substandard. It’s not hard to imagine that some fledgling solar contractors, seeing the potential in this technology, would start to install these without adequate training. There is a myriad of ways that these systems could be installed sub par. I have no hard evidence of this so I definitely would not comment on any specific examples. As I gain more experience I may be able to highlight some of the major errors that do occur with solar PV installations.

In the meantime, I have my training in hand thanks to Mario and the CSI, and I’m looking for experience!

Posted in Solar PV | Tagged , , | Leave a comment

EMF – Remediation

This is the third in a three-part series of my investigation of EMF in my house.
Part 1  EMF – What About It?
Part 2  EMF – The Survey

So I’ve done an EMF survey at my home and I have determined that the levels are higher than I’m comfortable with. If I want to take this further I have to take some concrete actions.

In my case, I determined that the bulk of the high EMF levels were the result of a net current from the ground connection to my water intake pipe. I also discovered a tie between the ground and neutral bars in an electrical sub panel. This is also a known creator of magnetic fields but is also very easy to cure. Figure 1 shows the sub-panel with this faulty wiring. I know I know, I should have checked this earlier. You know the old saying about plumbers having leaky pipes…

neutral-ground tie

Figure 1 – Improper neutral-ground tie in sub-panel

Anyway, the net current at my water intake pipe is most likely the result of faulty wiring in a separate residence somewhere in my section of the electrical grid. There may even be something of a feedback loop. Meaning the electrical fault in another residence is creating a magnetic field in my house which then is propagated to other houses and back. That is my own theory and I don’t have any research to back it up at this point but I’ll report on that when I find out.

In any event, at first glance the remedy to this problem seems to be out of my control. How could I possibly call upon the authorities or anyone else to start investigating all of the houses that are connected my segment of the grid for faulty wiring. Wouldn’t happen. Luckily there is a workaround.

Houses in rural areas are most often not connected to the city water system. Their water supply is from private wells which most often have some type of plastic piping coming in from the well to the pump equipment inside the house.  Plastic is not an electrical conductor and therefore this pipe from the well is not useful as a ground. Houses like this are grounded to metal rods or grounding plates buried in the ground near the house.

grounding plate

Figure 2 – Typical electrical grounding plate

What I’m going to do is change my grounding from the connection to the metal water pipe near the water meter, to a grounding plate like they do in the country. This is all perfectly legal and conforms to the Canadian Electrical Code, Rule 10-700(2)(b). Here is how I did it.

Firstly, I have to install a grounding plate underground, somewhere practically near the house. In my case there is a patio and some grass near the electrical service entrance at the back of the house.

types of grounds

Figure 3 – Types of electrical grounding (Section 250.50 is a U.S. electrical code reference)

The grounding plate, which can be purchased from most hardware stores, is buried in the ground not less than two feet in depth. A bare grounding wire is then connected to the plate on one end and the neutral bus in the main electrical panel at the other. I could have legally used two grounding rods instead but it would have been more work to drive them down to proper depth and connect the wiring I decided. Figure 3 is a diagram of all the grounding methods generally in use. I’m going to be using method 6.

In my case I have an existing connection from the main electrical panel to the water pipe. I’m going to disconnect the ground at the water  intake pipe and connect the wire from my new grounding plate to this wire. This will complete the connection from the electrical panel to the grounding plate.

dielectric uniton

Figure 4 – Dielectric union

The installation of the grounding plate is the first part of the operation. This does not however eliminate the magnetic fields from entering the home. There is still the water pipe coming in which is the source of magnetic fields. What I need to do next is install a dielectric union on the water pipe. It should be installed as close to where the water pipe enters the house as possible. This fitting will break the connection of the water pipes hopefully stopping the magnetic field from entering the home. 

So I’ve installed the grounding plate, disconnected the original ground for the water pipe, and installed the dielectric union on the main water pipe coming into the house.

Ground plate installation

Figure 5 – Grounding plate excavation

Ground plate trench

Figure 6 – Exterior view of grounding plate installation


The next step is to test for EMF fields. The results were that the readings near my plumbing pipes went from well over a hundred milligauss down to one or two milligauss. Success!

This concludes my three-part series on EMF in my house.
Part 1  EMF – What About It?
Part 2  EMF – The Survey
Part 3  EMF – Remediation

Posted in Electrical, EMF | Leave a comment

EMF – The Survey

This is the second of a three-part series of my investigation EMF in my house.
Part 1  EMF – What About It?
Part 3  EMF – Remediation

There are many sources of information about electromagnetic fields (EMF) and the potential implications of them. It can be confusing and seem contradictory even. Here are two opinions.  The first indicating that there does not seem to be much cause for alarm. The second opinion is of a more alarmist tone. This is what Health Canada has to say about the matter. Whether being very concerned about this issue or merely taking a cautious precautionary approach, a home or building owner needs to have an EMF survey done to determine the magnetic levels. It is odourless, soundless, and colourless.

Essentially the survey involves taking a series of magnetic field measurements around the property with a magnetometer or as it is often called — a gauss meter. Figure 1 shows the gauss meter that I use. It takes readings with the unit of measurement being the milligauss (mG). You will at times see magnetic readings in microteslas (µT) which is the metric equivalent of the milligauss. The conversion is 1 µT (microtesla) = 10 mG (milligauss).

Side note, I’m one of those people that does some of my technical thinking within the imperial measurement system and some in the metric (SI) system. I find that many, but not all, of the metric units are easier to work with. In this case gauss seems simpler to deal with. Also the meter I bought is measured in milligauss. But I digress.

Anyway, the basic electromagnetic survey involves taking exterior magnetic measurements at say the four corners of the building and possibly some in between points. This gives a background reading that forms the baseline for further interior readings. Interior readings can be done on a grid basis or possibly just at key points of the structure. Depends on the level of granularity that you desire.

I opted to take readings at a widely spaced grid and at key locations such as the electrical service entrance and panel. When doing a survey it is important to note that there will be magnetic fields near anything that is electrically powered. The survey readings need to take this fact into account. So valid readings are generally taken at least four feet from lights, appliances, electrical panels and the like. Figure 1 shows typical household EMF levels near appliances. Away from any appliances, the magnetic levels should not be more than 1 or 2 mG.

typical emf in houses

Figure 1 – Typical EMF levels inside the home


So I conducted the EMF survey of my house. The first measurements I took were on the exterior of the house at the street. I then moved in closer and took measurements around the outside of the house at approximately four feet from the ground. At this point what stated to become clear to me was that there was a higher EMF level as I got closer to the house. It was like my house was glowing with magnetism.

On into the house for further readings. As expected the levels were higher around the electrical panel and a sub-panel that is located about 30 feet from the main panel. I did expect to have higher levels at the electrical equipment, however they were higher than what is considered normal. Generally the levels were also higher than normal in other areas not near electrical fixtures or appliances.

The levels were very high in an area not near any electrical equipment. This had me puzzled. Literally off the meter high — my meter goes to 100 mG and these readings were way above that. The thing was they were not near any features that you would expect to have higher readings. As I investigated further, it became clear to me that the readings were high near and all along the copper plumbing pipe from the city to the house and all throughout the metallic plumbing piping inside the house. Shouldn’t be any electric or magnetic fields near a water pipe right? Well that’s true except that the municipal water pipe is where the majority of house electrical systems are grounded to. Figure 2 depicts a typical ground clamp on a water pipe.

Ground-Clamp

Figure 2 – Typical ground clamp on plumbing pipe


It turns out that the high EMF fields inside my house is an unintended consequence of this method of system grounding. I am starting to find out that many other houses have the same scenario. Since municipal water pipes are ultimately all connected together, it means that individual homes and other buildings grounding systems are all bonded together as well. All it takes is for there to be an unbalanced electrical load somewhere in your local distribution area to create a condition known as net current. This can telegraph itself all the way into your own houses’ electric system through the ground . This type of condition generally results in high electromagnetic fields. A good explanation of the phenomena is here. This is what I was dealing with in my own house. I also had other conditions inside the house which were causing high magnetic fields as well.

See the next post in the series, Part 3 EMF – Remediation to see what I did about it.
See the previous post in this series, Part 1 EMF- What About it? to see how I got here.

Posted in Electrical, EMF | Tagged , , , , | Leave a comment

Clothes Dryer Safety – Less Well Known Hazards

According to the National Fire Protection Association (NFPA) in the Untied States:

    • In 2010, an estimated 16,800 reported U.S. non-confined or confined home structure fires involving clothes dryers or washing machines resulted in 51 civilian deaths, 380 civilian injuries and $236 million in direct property damage.
    • Clothes dryers accounted for 92% of the fires; washing machines 4%, and washer and dryer combinations accounted for 4%.
    • The leading cause of home clothes dryer and washer fires was failure to clean (32%), followed by unclassified mechanical failure or malfunction (22%). Eight percent were caused by some type of electrical failure or malfunction.

I could not find any statistics for Canada but we could probably estimate the the numbers are about 10% of the U.S. numbers according to our populations.

Thankfully it seems that to have sunk in to most people that it is important that the venting from the clothes dryer should be non-combustible and clean. Here is more guidance in that regard.

The reference from the NFPA above noted that 8% of the fires were caused by some type of electrical malfunction. Not well known by the public but encountered by home inspectors from time to time is a defect in the dryer electrical breaker size.

For a number of years in the 1970’s and early 80’s it was common for electricians at least in some areas to install 40-amp breakers for the dryer circuit. This was likely because older dryers which would have been in use at the time would often overdraw current and trip the standard 30-amp breaker.

It is and has been standard for some time to install 30-amp breakers for clothes dryer circuit. The wire size (#10 gauge) and the dryer outlet are usually always rated for 30-amps max. The concern would be some kind of malfunction within the dryer could cause more current to flow through the wiring than it was meant to carry,  thus causing a potential fire hazard.

Fortunately, this is a relatively simple defect to correct. If your dryer circuit is protected by a 40-amp breaker, you should have it changed to a 30-amp breaker. This is true even if you have a larger gauge wire that is rated for 40 or more amp since the dryer receptacles are almost always rated for 30 amps. As well, the manufacturer instructions for most all dryers mandate that 30 amp breakers be utilized.

dryer outlet with 30-amp rating

Clothes dryer outlet with 30-amp rating

Posted in Electrical | Tagged , , | 1 Comment

Knob-and-tube wiring – Has it really all been taken out?

Hidden knob-and-tube wiring.

Hidden knob-and-tube wiring.

Recently I inspected a 1920-era apartment building for a client. The potential buyer and his real estate agent — and more than likely the seller — were under the impression that all of the old knob-and-tube electrical wiring had been taken out and replaced with modern wiring.

This can be a very difficult thing to ascertain 100%. Wiring is often updated in stages, sometimes over decades. Sometimes this hodge-podge approach to wiring updating results in little bits of old wiring remaining in service. It may only be a circuit or sometimes only part of a circuit, but it is there nonetheless and can be distressing to everybody. The picture shows a switch that I pulled out during the inspection and lo and behold — there was knob-and-tube wiring servicing it.

Posted in Electrical | Tagged , , , , , , | 1 Comment

EMF – What About It?

This is the first of a three-part series of my investigation of EMF in my house.
Part 2  EMF – The Survey
Part 3  EMF – Remediation

The topic of Electromagnetic Fields (EMF) and how it may affect the health of occupants of houses is complex and contentious. It has been an item of concern to many people for quite some time. A lot of people do remember the controversy in the 1980’s and early 1990’s in the Bridlewood area of Ottawa-Kanata. There were power lines near some residential areas and a school that had some  residents concerned due to EMF.

Not that much has been heard lately regarding that particular issue and indeed most government and institutional expert opinion seems to me to be cautiously reassuring if I can put it that way. I am rarely asked about EMF in my home inspection practice. It is also not part of the professional standards of practice of the Ontario Association of Home Inspectors (OAHI) nor of the American Society of Home Inspectors (ASHI). I tend to lean to the direction of the precautionary principal and this is a topic that I have been wanting to learn more of. I therefore decided to start with my own house.

EMF - gauss meter

Figure 1 – Tri-field gauss meter

The first instrument that I acquired on this quest is known as a gauss meter. There are many commercially available and I selected the Trifield Meter from AlphaLab, Inc.  I set out to do an EMF survey of my house which is a detached bungalow built around 1962. Upon completion of the survey I was shocked, and I don’t mean that to be a pun, but shocked at how high the EMF readings were in my house.

See the next post in the series Part 2 EMF – The Survey to see the results.

Posted in EMF | Tagged , , , , , | Leave a comment

Pink Stains in Bathrooms

Serratia marcescens

Pinks stains in toilet bowl.

There are pink stains that appear in biofilm in bathrooms and other areas of many houses. It will show up on the edges of bathtubs, on shower curtains, near taps, on ceramics, in toilet tanks or bowls, and even in water bowls used for pets. I frequently notice these stains in homes that seemed to have been meticulously cleaned and cared for.

Many people believe it is minerals or other elements in the domestic water supply or some type mildew that are responsible for the pinkish-red stains. It turns out the culprit most of the time is a bacteria known as serratia marcescens.

Serratia marcescens microscope

Serratia marcescens under a microscope.

It is an airborne bacteria that is often present in soil and is introduced into the house through windows and other openings.  It is often found inside homes in new subdivisions. Likely the digging and turning up soil during construction is teasing the bacteria out into the air. The bacteria appears to be pathogenic to some people therefore regular cleaning of the biofilm is advised.

Here’s a website that briefly explains the concept and how to keep the bacteria at bay. Along with regular cleaning it is also important thing is to keep standing water on surfaces to a minimum. Shower squeegees are used for this purpose.

Posted in General Interior | Tagged , , , , | Leave a comment